
I love the process of dyeing fabrics, and have been dyeing cotton fabrics for years using Procion Dye. So a couple years ago when some beautiful scarves caught my eye at a gift shop and I found out that they were made using natural plant materials, I knew I had to find out more.
I immediately searched for a class, and found one at Ohlbrich Gardens here in Madison taught by the talented and informative Shelly Ryan (The Wisconsin Gardener from PBS)–see this link for an even better tutorial! If you get the chance, sign up for a class with her–she’s an amazing person!
We made several scarves that day. I’ve recently gotten back into it, after being asked to teach a little workshop for a few friends. I hope you’ll give it a try as well…here’s how.
First, I purchased 100% silk scarves through Dharma Trading Company made especially for dying. They have many styles and sizes to choose from. The ones I used were “Habati 8mm hand rolled China 100% Silk”. The protein-based silk fiber takes the plant dye beautifully, but is durable enough to stand up to the process.
You’ll also need:
Dye–plant material. You can use everything from flower petals, to leaves and ferns, to weeds; search your kitchen scraps for carrot peelings, red cabbage, onion skins, avacado; or your herbs and spice cabinets for tumeric, cinnamon, tea leaves; or even coffee grounds. The sky’s the limit!
Mordant–to bond the color to the fiber, you’ll need to have on hand either steel wire, copper wire, even a penny will work, or a spray deodorant that contains aluminum.
Acid-based liquid–to release the color from the plants–vinegar (white or cider, doesn’t matter), wine, fruit juice.
Also have on hand some sturdy plastic zip-lock bags (I used freezer quart-size), waterproof bowl or tray, rubber gloves, and a sharpie pen.

Lay the silk scarf on your work surface with half on the surface and half hanging off. (This is the point where you would spray it lightly with the deodorant before adding plant materials if you’re not using steel or copper.) Layer the plant materials on top of one half of the scarf in any way you choose–you don’t need to worry about covering every square inch–just have fun. There’s no wrong way! Experiment! Use one or two things, or pile on a bunch of different things. My scarf (in photo) had red onion skins, turmeric (spice), cinnamon, coffee grounds, & shredded carrots on it!

Fold the other half of the scarf on top of first half and from one short end start rolling it; then make it into a ball (or roll again like a cinnamon bun) and secure with the steel or copper wire. (Be sure the steel wire is not galvanized–we want it to “rust”.) If you used the deodorant spray earlier instead or the wire, you can use yarn or string to tie.

You might want to write on your baggie with the sharpie pen what plant materials you used, in case you’re keeping track. Then place the scarf it in your baggie and add whatever acid-based liquid you want–I chose to use white vinegar, cheap & in my kitchen already. You only need 2-4 tablespoons! Just enough to thoroughly wet it.

Then close up the baggie and place it in a waterproof bowl or other container–this is just a precaution, in case the bag should leak.
Now the HARD PART…you have to WAIT! Place the baggie away from kids & pets, and out of direct sunlight, and let it sit (cure) from 3 days to up to 2 weeks. I know it’s hard–but it will be worth it. I mark the “reveal” date on my calendar and try not to think about it…
When the “reveal” day is here, put on your plastic gloves (the vinegar might be a bit irritating to your skin) and over a lined wastebasket, or outside in the yard, “pour out” any remaining vinegar & shake out all the plant material. Now take the scarf outside and hang it over a tree branch or bush (or clothesline) and let it dry out for a few hours.
WAIT TIME AGAIN! Now you’ll bring it inside and just let it dry for about 2 weeks. I know, patience is a hard virtue!! But you will be rewarded…
After the two weeks is up you can wash your scarf in warm water (I like to use my sink with a little Woolite or mild detergent) and rinse it thoroughly. Then before it drys completely, iron it with a hot (silk setting) iron to set the color.

That’s it! You have a beautiful hand-dyed scarf to wear or give as a gift. Here’s how the scarf turned out with the onion skins, etc.
Here are some other examples:
Dandelions, Raspberry Hibiscus Tea Leaves, Strawberry Tops, & the dreaded Garlic Mustard:


What a great way to commemorate a special event (anniversary, birthday, funeral), by using flowers from a bouquet. My son sent me a dozen light pink roses for Mother’s Day, which unfortunately only last a week or two. So I used the fallen petals in this scarf along with other petals from the garden and some Seattle Chai Tea (because he lives in Seattle)…


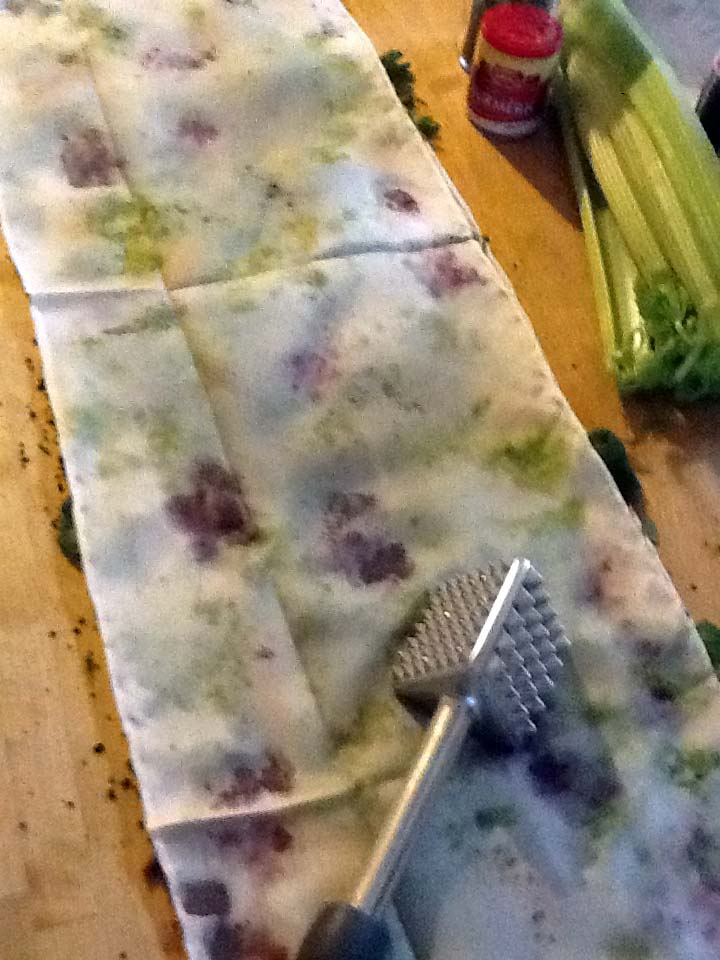
And finally, here’s a scarf made with celery and spinach leaves, oregano and turmeric, coffee grounds, and I threw in a few frozen blueberries just for fun…

After folding over the second half of the scarf, I smashed it a bit with the flat side of a meat tenderizer just to make the juices come through a little more…

I hope you’ll give dyeing scarves with natural plant materials a try. It’s really a lot of fun. I can’t wait to try other items from my garden and refrigerator–wonder what will happen with avocado? red cabbage? So many plants, so little time! 🙂
For more information, see Lauren Maple on PBS “Sewing with Nancy” segment.

Good evening I look forward to dying scarves with natural products, but I have a question about using the penny. If I use the penny as my mordant, do I add it to the Baggie with the wrapped and tied scarf and the vinegar? Thanks for your help!
Yes. You’re exactly right. It goes in the bag with the scarf & vinegar😊
Just wondering what size scarves you use or you find work best for dyeing? I plan on ordering from Dharma Trading Company, there are just so many sizes to choose from.
Thanks again.
Just wondering what size scarves you use or find work best for dyeing as there are so many sizes through Dharma Trading Company?
Thank you
Their 100% silk Machine Hemmed or Hand Rolled 8mm Habotai Scarves are the ones I chose from Dharma Trading Co. The size is really up to you–-any size will work. I prefer the scarf to be at least 8″ wide and 54″ or more in length–but that’s just my own personal preference. I like that size because it’s easy to manage and they’re less expensive so I can “play” more. 🙂 I have a scarf that’s 11 x 60″ and love it, too. Have fun, enjoy the process, and thanks for stopping by.
Hi just wondering if using dried herbs works or if it’s necessary to use fresh? I’m thinking of calendula, will the color come out of dried as I assume it will fresh?
Although I’ve never tried Calendula, and I’ve used mostly fresh flowers and leaves, I’ve also used herbs, tea leaves, coffee grains, dried rose petals, tumeric, cinnamon, etc., and they’ve all worked great. So why not give it a try? …experiment, …have fun. I’m always surprised by how the final outcome is different than I expected, and I think that’s half the fun of the process–the unveiling moment of surprise. Be sure to write down things that you used, so that after unveiling–if you really like it–you’ll remember and you can try it again the next time.
After you took it out and let it dry for a few hours was there a smell? I’m worried about what it’s going to smell like and if the flies will be attracted to it since it is essentially sitting in rotting food? Just started my project today with cinnamon, turmeric, raspberries, blueberries and carrots. And I’m soooooo not a patient person. Really wish I had tried this a month ago so I could have a test run done before now and I might have some ready for a craft show in a two weeks. Lesson learned.
I’m so glad you’re enjoying the process. I agree that the waiting is the hardest part! Any smell is usually the acid (the vinegar, wine) and not too unpleasant. And the smell fades as it dries , and washes out completely later–so it’s no problem . Have fun!!
Instead of bringing indoors can it just cure in a shaded area? Worried about the smell after it’s unwrapped the first time.
After you’ve removed all the plant material & let it air dry outside for a few hours, it really doesn’t smell much at all. I wouldn’t leave it outside for the rest of the curing time because of the unpredictable temperature changes, rain, etc. but maybe a covered porch or garage if you’re really sensitive. See what you think after its dry.
Thanks. Can’t I use cotton fabric?
You certainly can use any material with natural fiber content, including 100% cotton. The result may be different, but give it a try. I’d use PDF (prepared for dying) cotton fabric, or wash your fabric first to remove any finishes that might resist the dying process.
My copper wire ate holes right through my silk scarf. It was only in the vinegar baggy for a little over a week. Have you had this happen? I was so disappointed!
How very disappointing. Silk is such a strong material, I’m very surprised. I’ve never had that happen. Was it in a warm place or direct sunlight?
Interesting! Just wondering: do the colors change after Some months/years?
I have a few scarves that are 10 years old, and they look the same.
Very interesting method! Thanks
First, thank you for sharing your method. Your scarves are beautiful! I tried this out on three scarves and love the colors, but all have hard rust stains. Is that supposed to happen, how do you get it out, and can you tell me if I did something wrong? I used copper wire on two, steel wool on the other, and with different vinegars.
If you look closely at my scarves you might see what I think you’re talking about. But they weren’t “hard” (didn’t change the hand or drape of the fabric). If it actually made the fabric hard, I’m not sure. It sounds like you did everything right.